Offline capabilities in PowerApps was one of the most requested features on UserVoice according to Microsoft so it is an incredibly popular topic. Making your PowerApps work when there is no connection to the Internet, offers huge benefits for remote field workers, salespeople and frequent travellers. We are clearly in an age where we can be connected in a lot more places, but there are still those scenarios where your workers will be offline and need to be able to use your PowerApps.
In this article, I am going to explain the following:
- The Challenges of supporting Offline Mode within PowerApps
- How to create, read, update and delete (CRUD) data when offline (and when back online)
- How to automatically sync offline changes back to an online data source.
This article was created based on a presentation I gave at the PowerApps Virtual Summit. If you’d like to watch the video then it can be viewed here (but does require an on-demand “Summit Pass”).

What’s out of scope in the article?
Offline Mode can get really complicated when you think of scenarios such as how to manage merge conflicts. For example, imagine 2 remote workers using the same PowerApp and editing the same piece of data. When one updates the record (while the other is offline), this would cause a conflict resolution that’d need to be handled by the PowerApps developer. Although this article isn’t going to provide a solution to this, it’s certainly worthy of consideration if your PowerApp is widely used and supports many workers accessing the same data at the same time.
As the goal of this is to be a level 300 article, we will just assume that this won’t affect our PowerApps 🙂
Challenges?
As mentioned, Offline mode in PowerApps can throw up many challenges, namely around synchronising data and resolving conflicts in that data when going back on-line. To handle this properly, you’d have to build extra PowerApps screens to allow the user to select which version of the data is the truth, at that point in time. This isn’t an insurmountable problem. Given time, developers can think of all the possible scenarios and write a UI and code to handle it. PowerApps doesn’t offer features to accommodate this, but nor does it prevent you from handling them yourself.
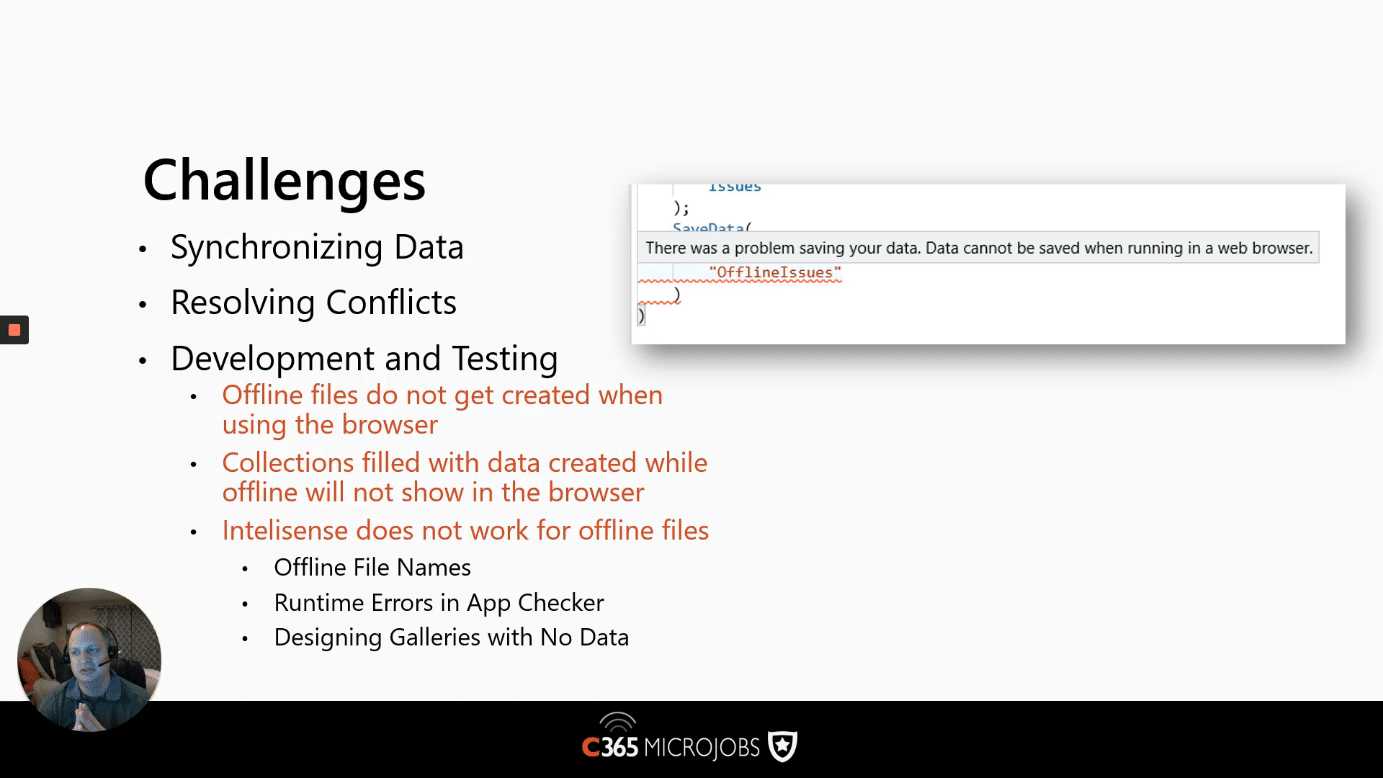
The biggest challenge facing, Offline PowerApps support, at the moment is based around development and testing. If you want to create “offline” files (data) with your PowerApp then this relies on using the mobile device’s memory. If you’re developing in a browser, or in “preview” mode in PowerApps studio, then the code you write to support offline mode won’t be able to access these local files. This challenge will also manifest itself when you have Collections with offline data.
In the image below, you can see the type of error you will receive when trying to save data locally if developing (or running) in a web browser.
The intellisense, that gives you type-ahead support and UI hints, also won’t work properly for offline files.
It’s also hard to design and style galleries where the data will only be resident when offline, resulting in you needing to create “fake data” and then remove it before saving.
Tip: To debug and test your apps, you can easily put your phone in “airplane mode” which will simulate the mobile device being offline.
What’s the standard (“Out of the Box”) Offline behaviour?
You may be wondering how PowerApps works if you do nothing to support offline mode. What works and what doesn’t?
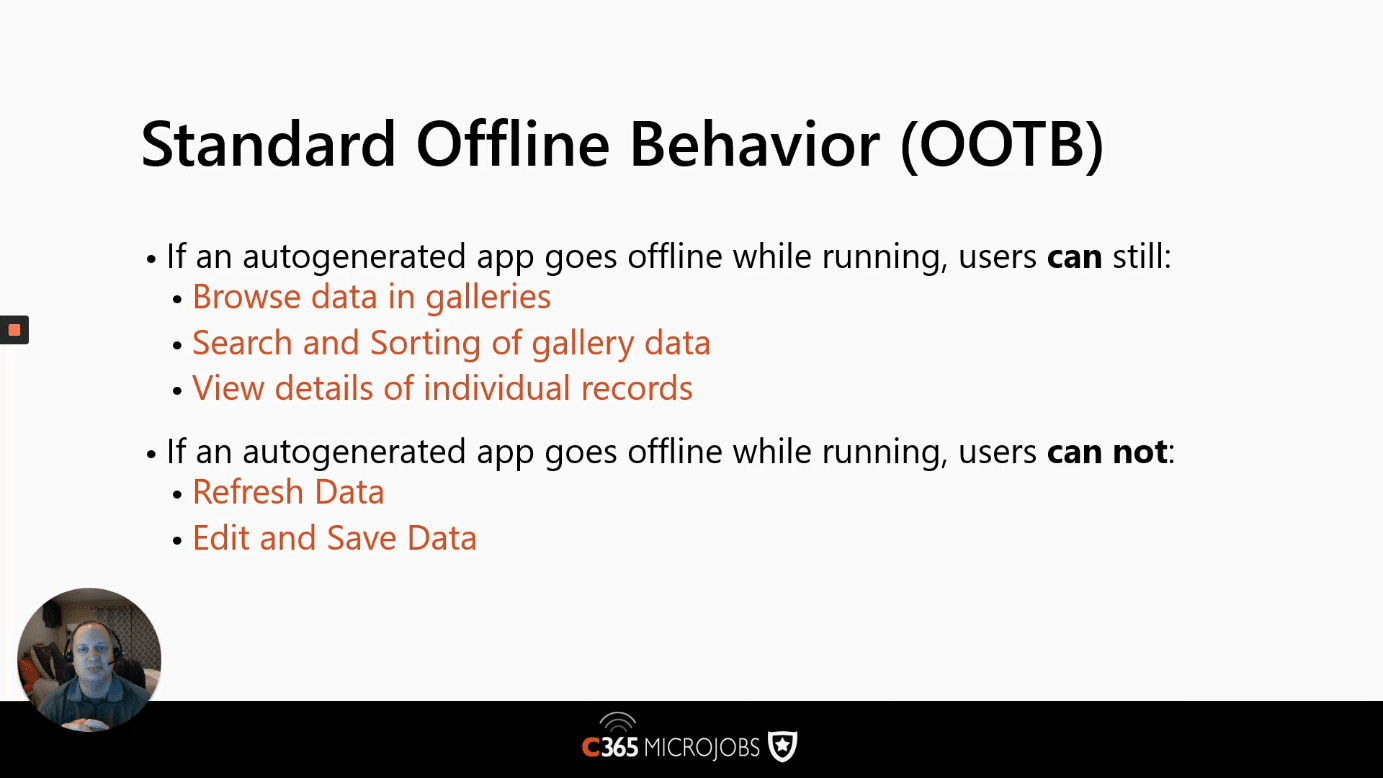
If you create a standard 3-screen app based on a data source some of the things you can still do are:
- Browse data in galleries
- Search and Sorting of gallery data
- View details of individual records.
However, you cannot:
- Refresh data via your data source as the connection is down, or
- make any edits, delete or save the data
In other words, if the data is already loaded into the PowerApp you can still navigate it, but anything requiring you to change or refresh it is not going to work.
Meet my demo Offline PowerApp
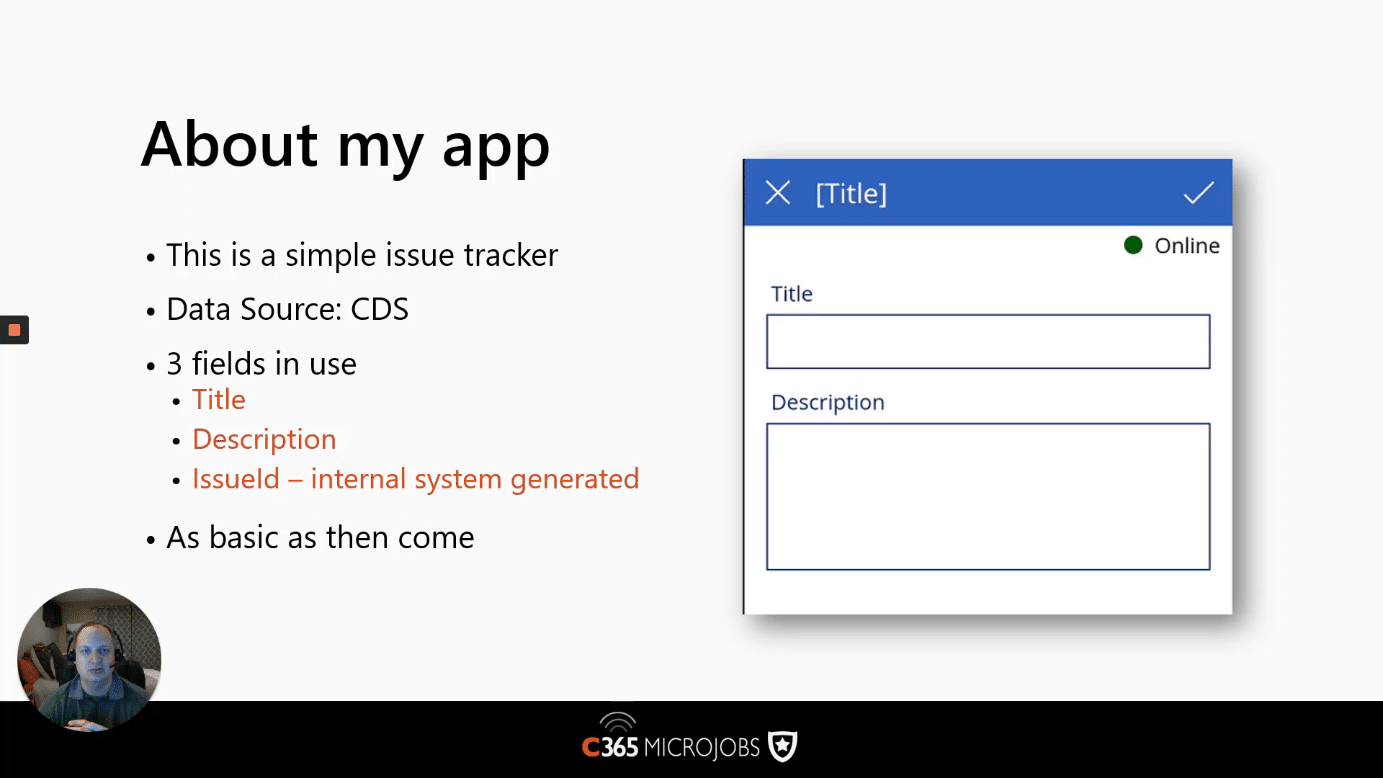
In this article, I am going to refer to a very simple looking PowerApp that I built to demonstrate the Offline techniques discussed later. The App I am building is an “Issue Tracker” where the data is stored in the Common Data Service (CDS). There are 3 fields stored; namely “Title”, “Description” and internally generated “ID”. The screen below shows what it looks like to create a new “Issue”.
Foundations of Offline Capabilities
What building blocks does PowerApps offer to allow us to build in Offline support? There are 3 main things that we need to utilise (and get very familiar with), as follows.
The Connection Signal
This is the object that we can use to query if the device is Offline or Online. For example, when we query “Connection.Connected()” it will return “true” when there is a connection and “false” when there isn’t. This is usually done like this: Connection.Connected(“Online”, “Offline”) (which could set a labels text property, for example).
SaveData()
The SaveData() function allows us to save data to the Offline file.
LoadData()
The LoadData() function allows us to load data from the Offline file.

The Connection Signal
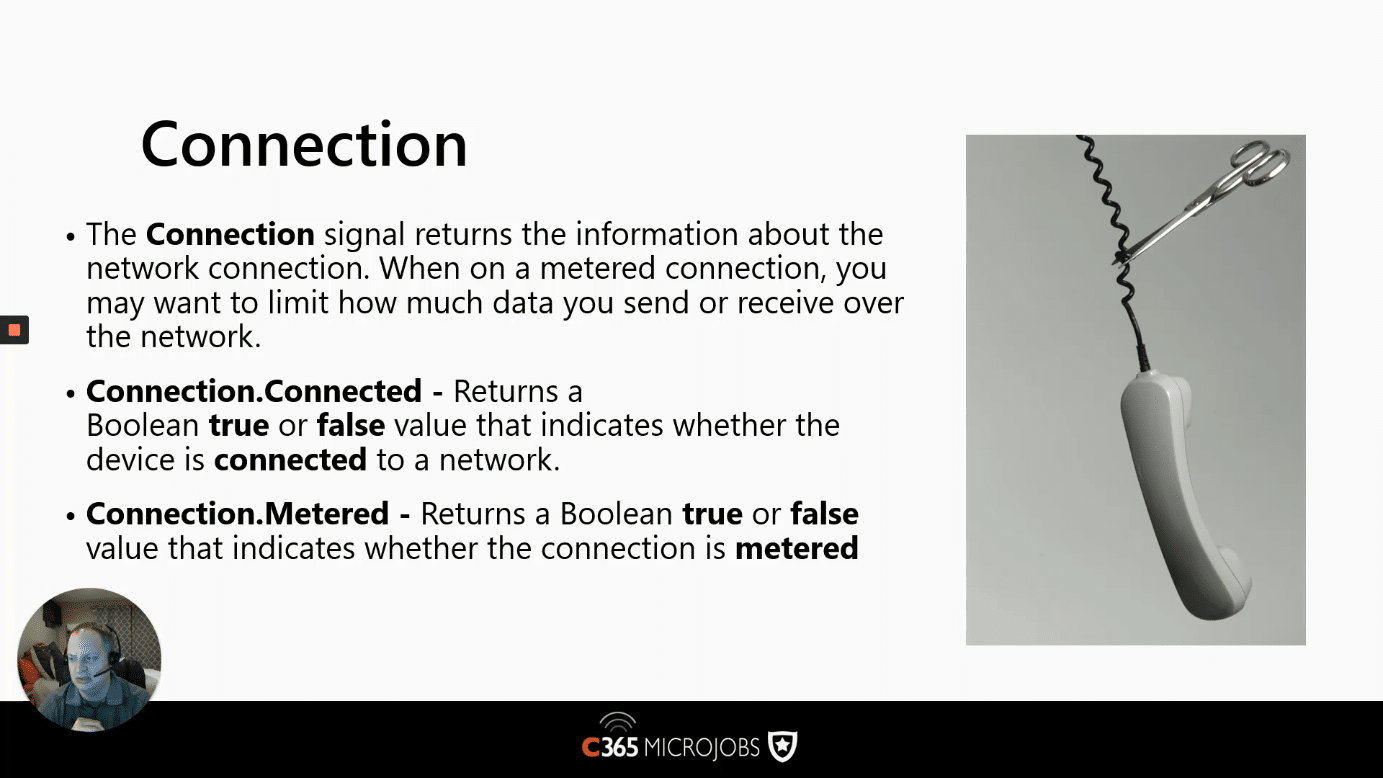
As mentioned in the next screenshot, the Connection signal returns the information about the network connection. When on a metred connection, you may want to limit how much data you send or receive over the network. To check for a metered connection, you query “Connection.Metered” which will return “true” or “false”. Querying Connection.Metered is useful because you can assume a user either is paying for the data or may have a low bandwidth connection. In this instance, you might want to prevent large amounts of data coming down to your PowerApp such as video, or large images.
Connection.Connected has already been discussed earlier.
A demonstration of the Issue Tracker App
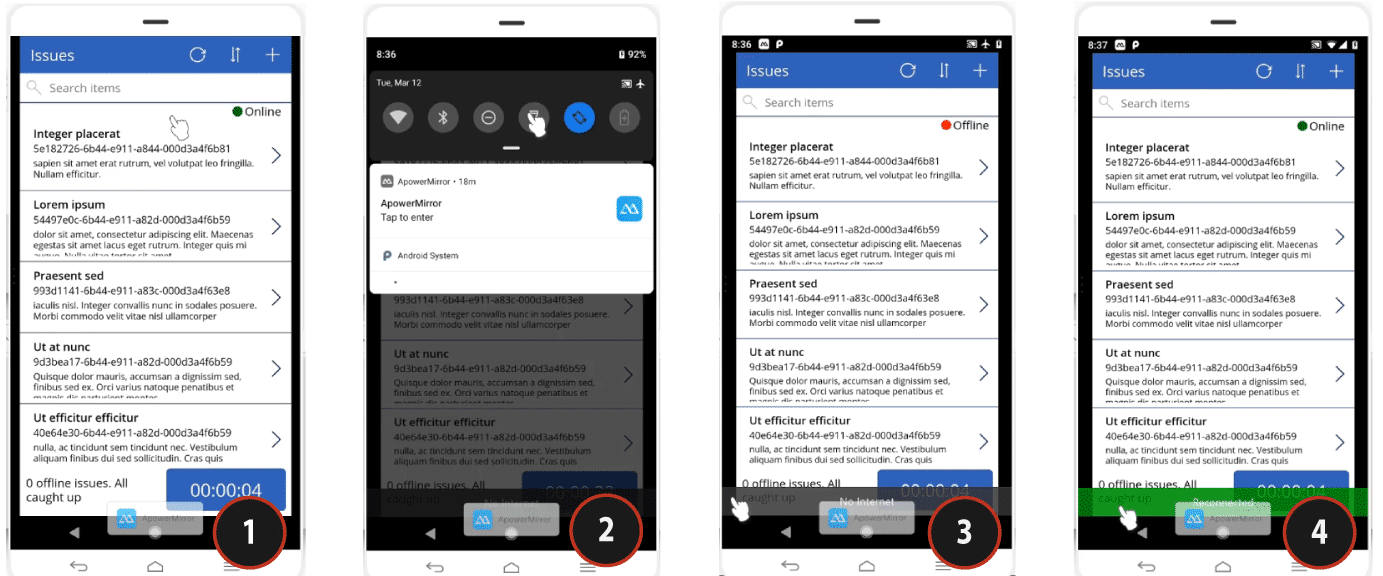
The screens below demonstrate the entry point and home screen to my Issue Tracker App.
TIP: As an aside, if you ever need to demonstrate your PowerApp working Offline mode to an audience, you will need to mirror it to a projector monitor somehow. I found that there are several apps out there that can easily mirror a phone but, if you then turn on “Airplane mode” (to demonstrate “going Offline”) then the mirroring will stop working. Not ideal. I am using PowerApps on Android and found a mirroring app that works via USB called ApowerMirror. This also what I used to present my session at Collab365 PowerApps Virtual Summit.
Moving back to the demo …
- Screen 1 – This is simply the way to load the app from the PowerApps menu. I clicked “Issue Tracker”.
- Screen 2 – A loading screen opening my app (and typically where you’d load in your “On start” code).
- Screen 3 – The main screen has a “Simulate On Start” which is running the functionalities that would typically in the “In Start”. In our case, it is pulling data from the data source and populating our galleries.
- Screen 4 – Once the On Start has completed the button is re-enabled.

Once we’ve retrieved all of the data we require for the Issues, we’re ready to show them:
- Screen 1 – This presents our Issues. Notice that there’s a green circle to denote that the device is “online” (more on this shortly).
- Screen 2 – This is me turning my phone to “Airplane mode” to make it effectively completely Offline.
- Screen 3 – You can now see that the green circle has changed to red and the text now says “Offline”. It’s also worth noting that natively, PowerApps will show a partially transparent black rectangle that says “No Internet”. You will need to tap that to make it disappear.
- Screen 4 – This shows what happens when I turn Airplane Mode back off. The native experience then shows a green rectangle to signify the phone is back online.
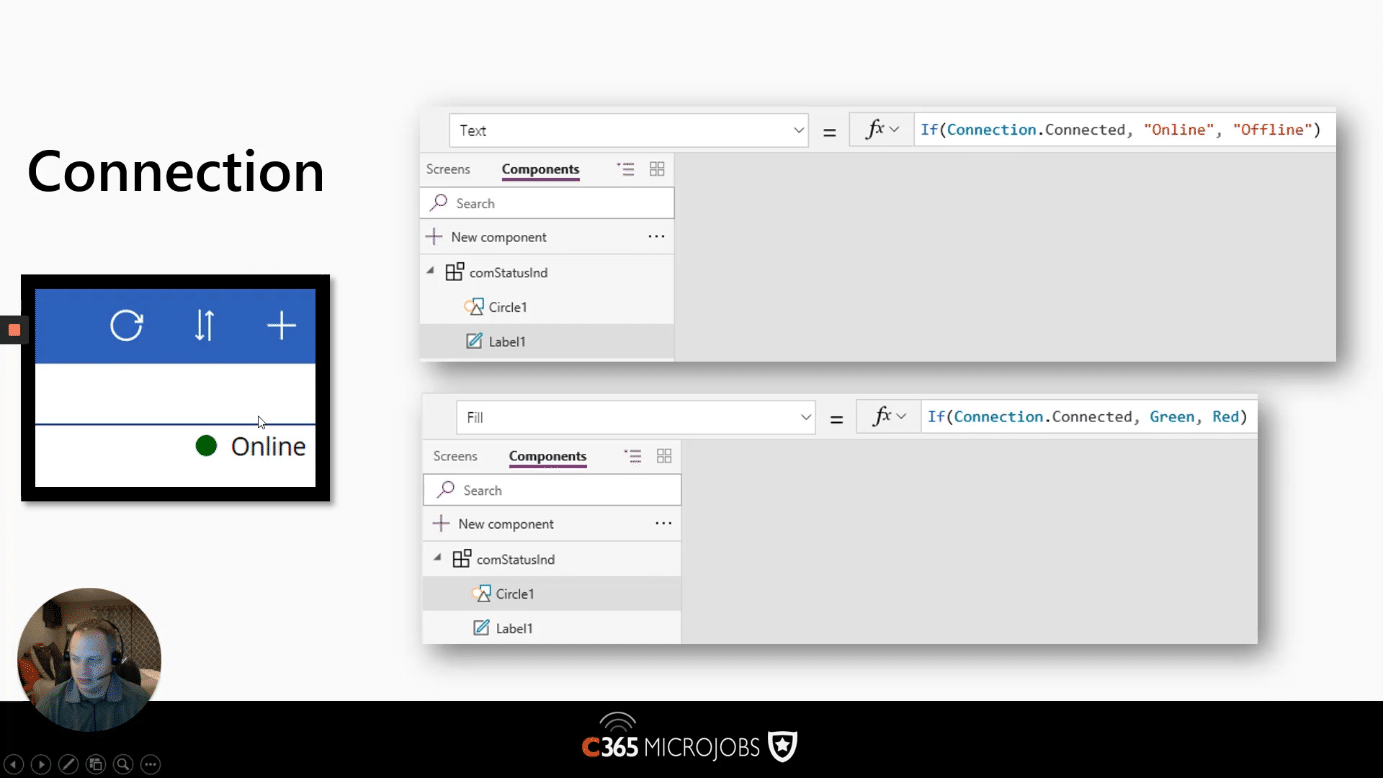
Using the “Connection” Signal
We’ve already touched on how you can query the Connection signal but now we want to take a look at how we can build a small “component” with a circle and a label to show whether it’s offline or online (see next image).
Microsoft recently implemented components into PowerApps, which allow you to group controls into a reusable component. For this demo, I made a very simple component to show the connectivity status (called ‘comStatusInd’). This means it’s really easy to reuse it across screens without having to recreate it each and every time.
How do we make the circle green or red based on the connection status?
To achieve this drop a circle onto the canvas and set its color property to this function:
- -> If (Connection.Connected, Green, Red)
How do we change the text to show Offline or Online?
Drop a label onto the canvas and set its label property to a function of:
- -> If (Connection.Connected, “Online”, “Offline”).
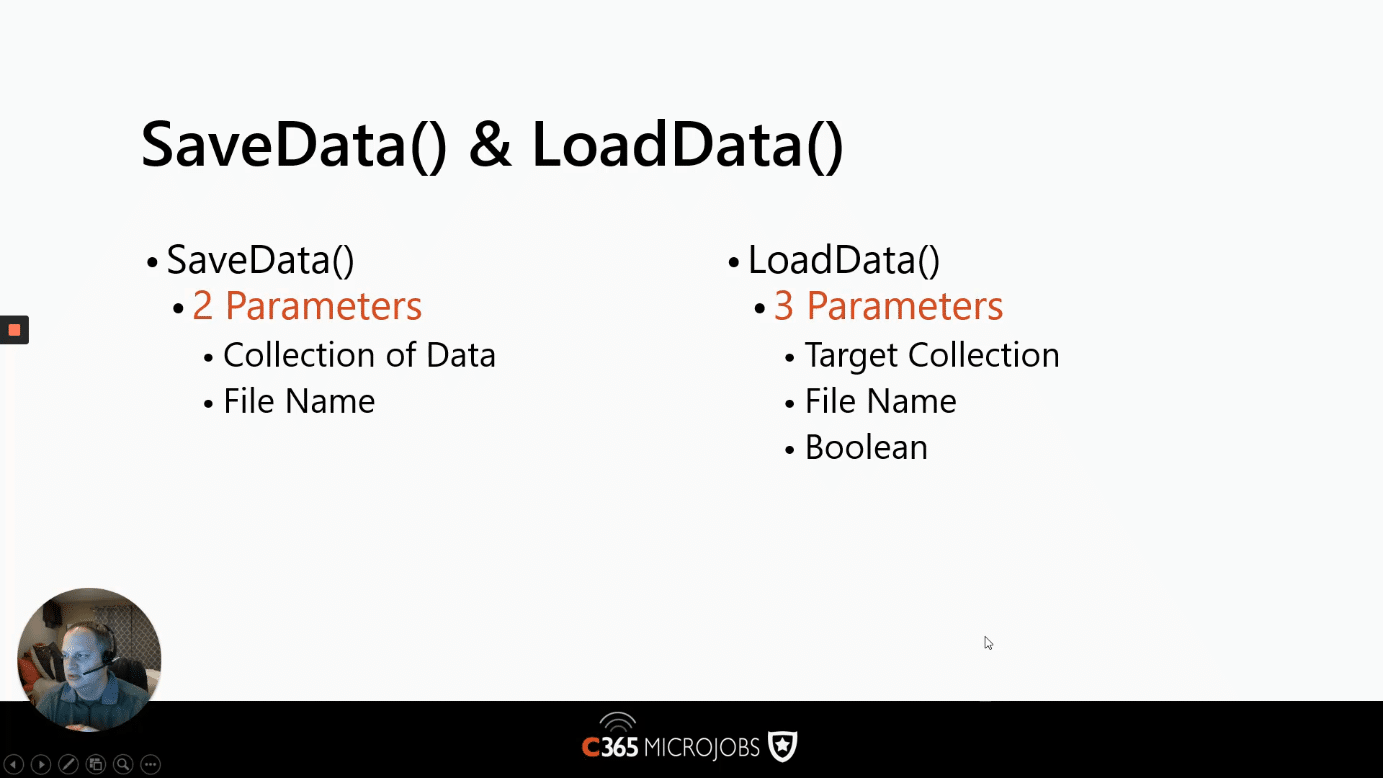
Using SaveData() and LoadData()
These 2 functions are really important and it’s essential you have a good understanding of them. So let’s give a rundown of how to use them both.
SaveData()
This function is used to save data to the collection and takes 2 parameters:
- Collection of Data – the data you want to save in the Offline file.
- File Name – Name of the file to store against.
LoadData()
This function, as you’d imagine, is used to load data back out of the local collection and takes 3 parameters:
- Target Collection – the collection you want to load the data into.
- File Name – the file name containing the data.
- Boolean – True / False … if you can’t find the offline file do you want to load without an error. (normally you’d set this to “True”).
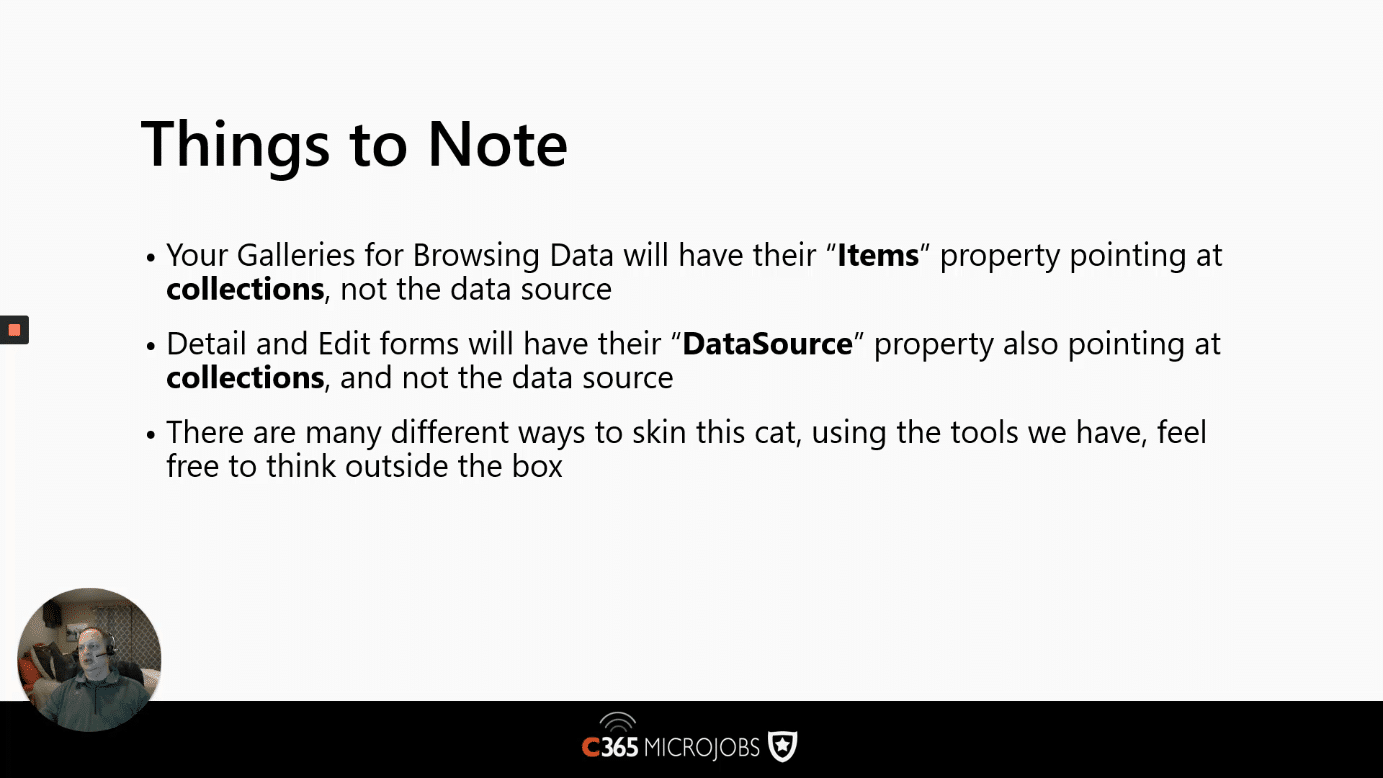
Other points of Note
The major point to make about the following slide is how you will bind your controls to their data. To support Offline mode you will need to bind them to the local collection rather than the underlying data source. If we didn’t do this then when you try to browse or edit the forms as soon as the connection goes your PowerApp would error. Pointing them to the collection allows the PowerApps to still serve the user with the data it has.
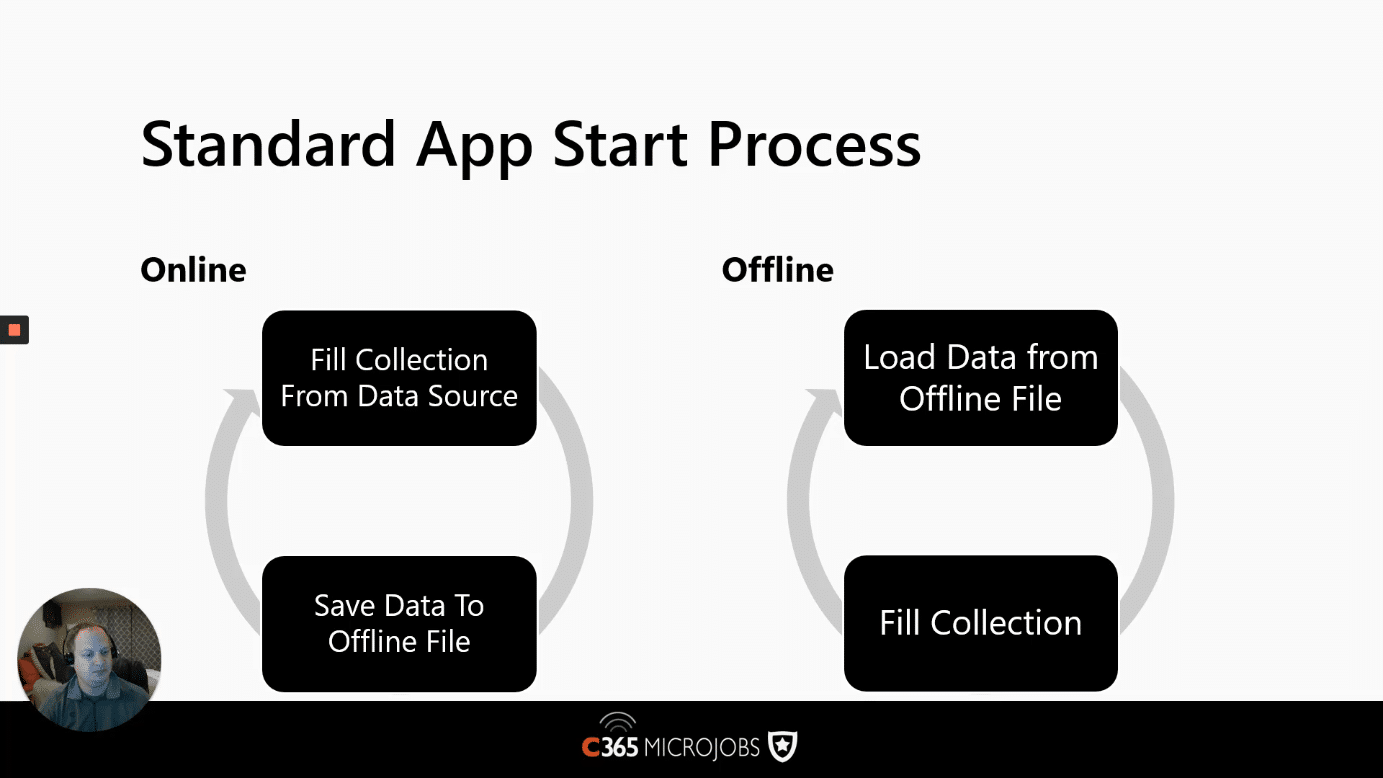
What is our standard App Start Process going look like in an Offline enable PowerApp?
When your PowerApps loads you would probably want to follow these steps:
If your PowerApps loads with an active connection …
- Get the data from your data source and load it into a collection.
- Save the Collection Data to an Offline file.
If your PowerApps loads with no active connection …
- Load the data from your local Offline file.
- Fill the collection from that locally loaded data.
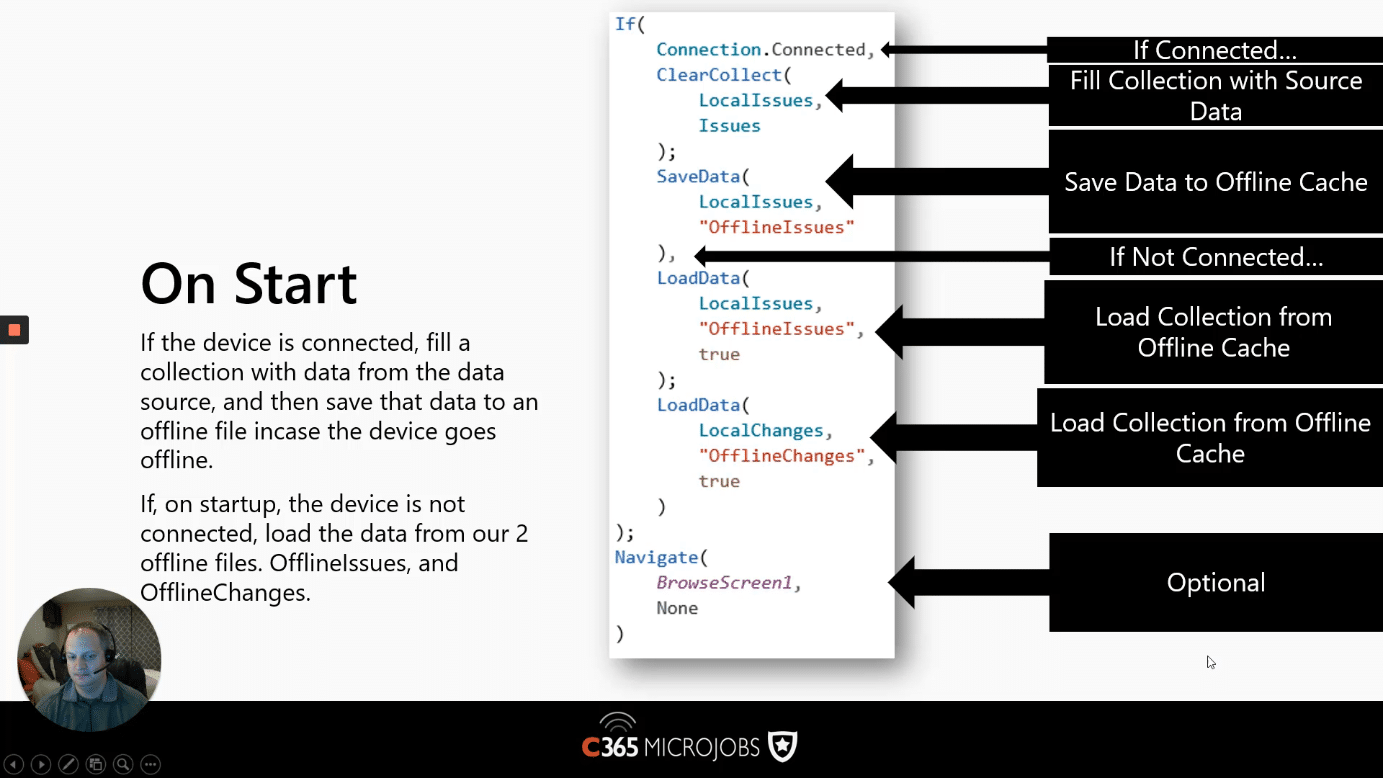
A Typical “On Start” examined
The following slide illustrates how you structure a code snippet to handle the On Start for an Offline enabled PowerApp.
If there is a connection:
- Connected.Connected – this returns a boolean if the mobile device is connected or not.
- ClearCollect(LocalIssues, Issues) – The ClearCollect function will delete all the records in “LocalIssues” and then fill it with data from “Issues”).
- SaveData(LocalIssues, “OfflineIssues”) – This will save the data to a collection called “OfflineIssues”.
If there is no connection:
- LoadData(LocalIssues, “OfflineIssues”, true) – If we’re not connected (denoted by the comma), this reloads collection with the name “OfflineIssues”. The “true” tells PowerApps to ignore any loading errors.
- LoadData(LocalChanges, “OfflineIssues”, true) – If we’re not connected, we’re also going to load another collection the name “OfflineIssues”. The “true” tells PowerApps to ignore any loading errors. This will store all the changes made when offline.
In both Offline and Online cases you then want to:
- Navigate(BrowseScreen1, None) – regardless of whether the device is offline or online, we will then navigate to a screen called “BrowseScreen1”, which will show the data.
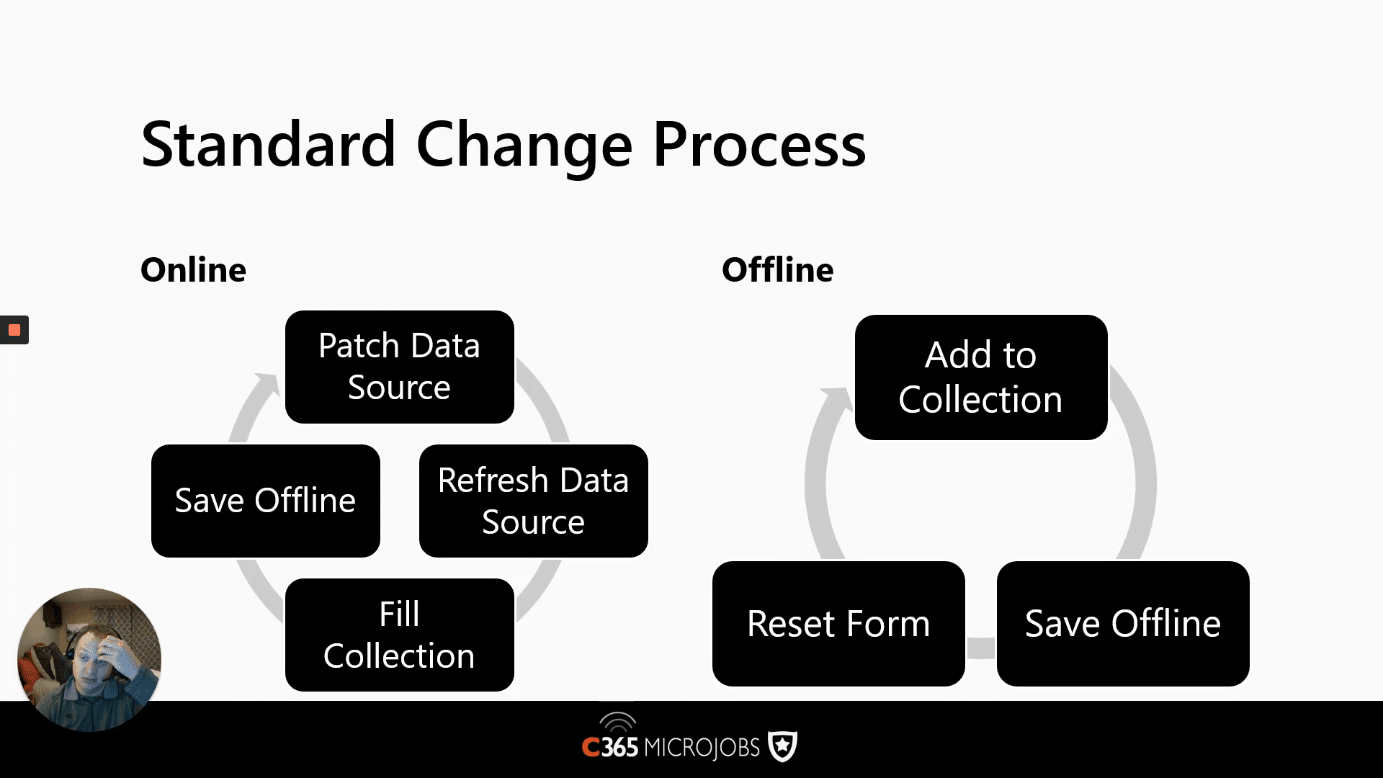
What happens when a change to the data happens?
When a change happens to the data this is the process that we will need to follow for Online and Offline:
Online change management
If we’re online we’re going to patch the data source, refresh it, fill a collection with data and then save it offline.
Offline change management
If we’re Offline when the data is changed it’s saved a collection that will track the changes. We then save that collection Offline and then reset the form to reflect the change.
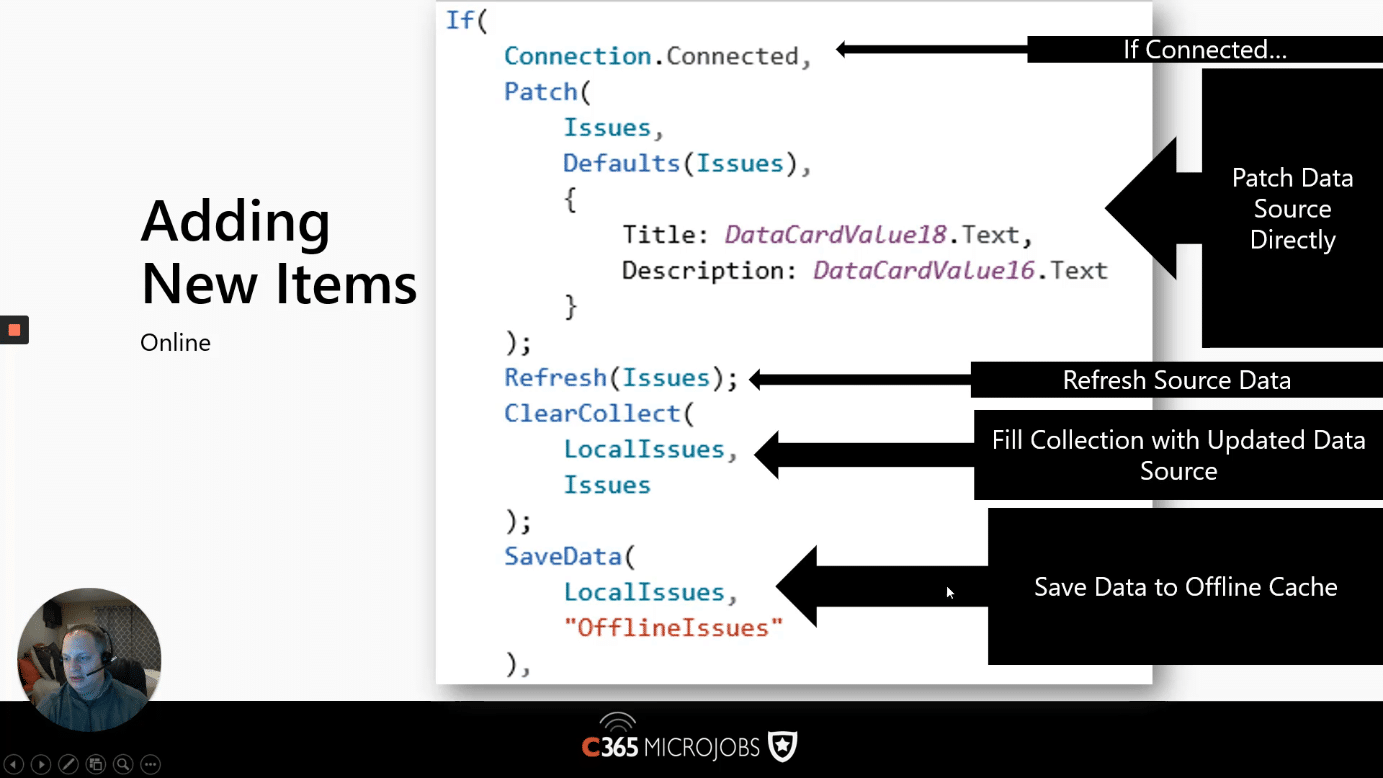
How to add new items when you are connected to the Internet.
If the device has a connection then this is the flow illustrated in the following slide:
- If (Connected.Connected …) – this returns a boolean if the mobile device is connected or not.
- Patch(Issues, Defaults(Issues), { … } – As we are connected to we want to create a record in the “Issues” data source, using a default issue record and a change record supplied by values from the UI (as JSON).
- Refresh(Issues) – Now that we’ve patched the data, we need to refresh the records in the “Issues” data source.
- ClearCollect(LocalIssues, Issues) – Fill the collection with the updated data source.
- SaveData(LocalIssues, “OfflineIssues”) – This will save the data to a collection called “OfflineIssues”.
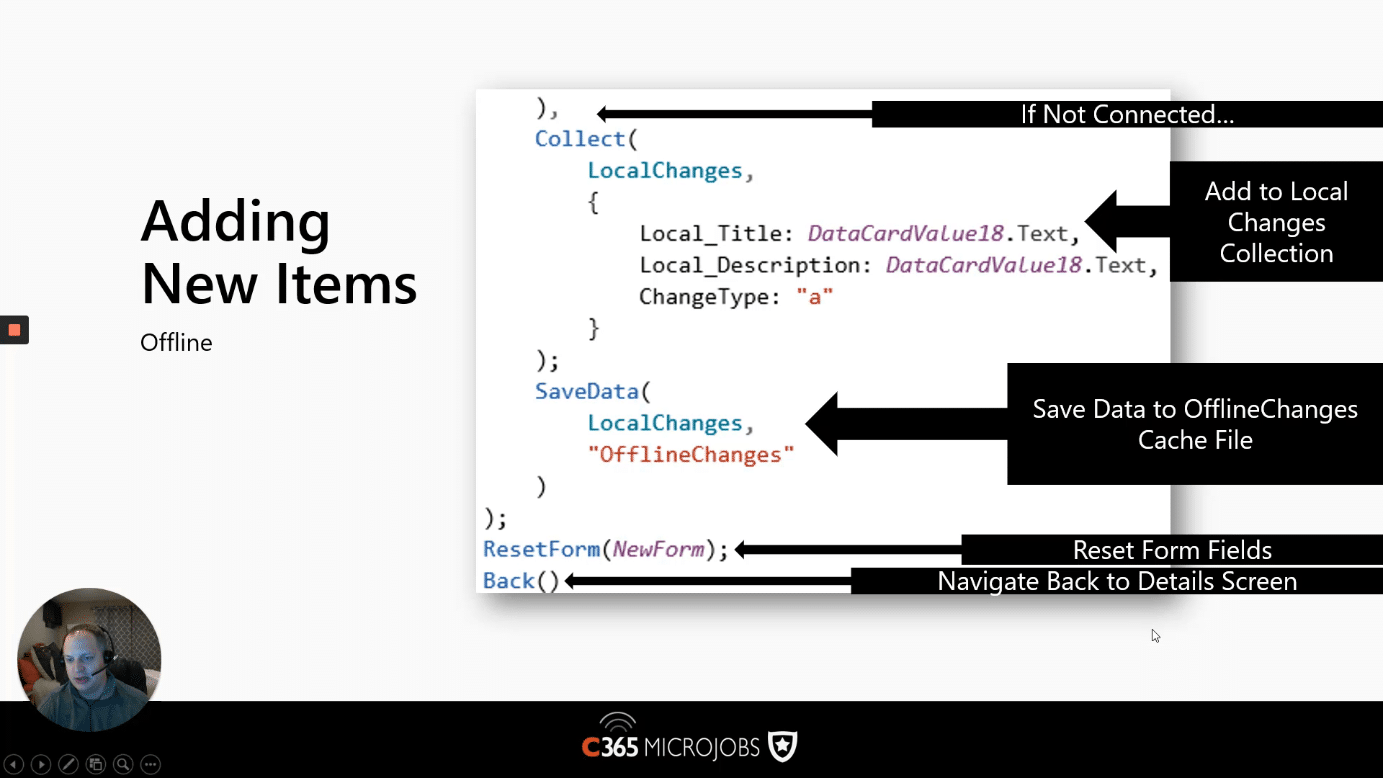
How to add new items when you are disconnected from the Internet
If the device has no connection to the Internet, then this is how you would code this up to save the records locally to the device (not the data source).
- If (Connected.Connected …) – not show on the slide, but let’s assume this returned “false”.
- Collect(LocalChanges, { … }) – Add the changes made in the UI to a our local collection called “LocalChanges”. We used “ChangeType” to denote the type of change (e.g. “a” = add, “d” = delete, “e” = edit). This is used to sync your changes back up when reconnected.
- SaveData(LocalChanges, “OfflineChanges”) – This will save the data to a collection called “OfflineIssues”.
- ResetForm(NewForm) – Reset the contents of the form to its initial values.
- Back() – Display the previous screen.
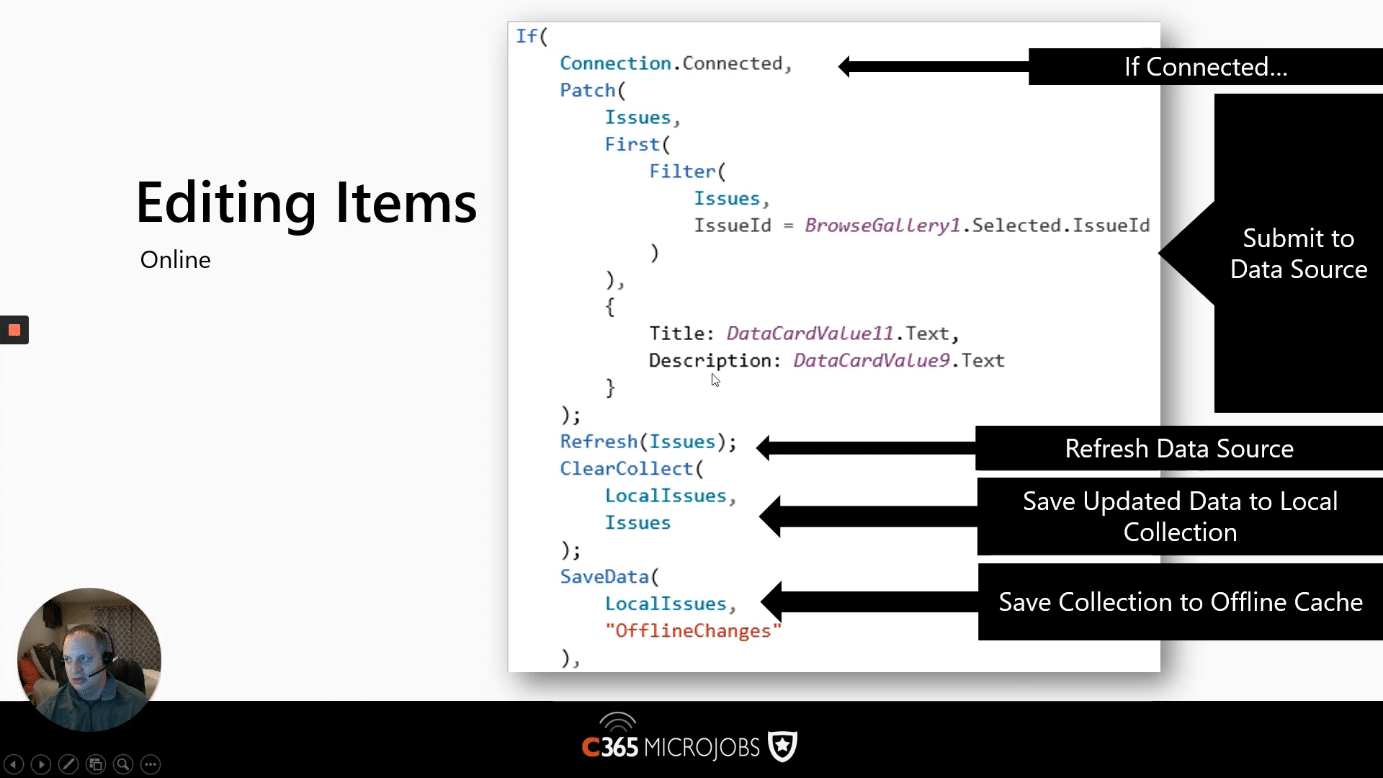
How to edit items when you are connected to the Internet
If the device has a connection then this is the flow illustrated in the following slide:
- If (Connected.Connected …) – this returns a boolean if the mobile device is connected or not.
- Patch(Issues, First(Issues), { … } – As we are connected to we want to create a record in the “Issues” data source, using the first Issue record (matching the IssueId) and a change record supplied by values from the UI (as JSON).
- Refresh(Issues) – Now that we’ve patched the data, we need to refresh the records in the “Issues” data source.
- ClearCollect(LocalIssues, Issues) – Fill the collection with the updated data source.
- SaveData(LocalIssues, “OfflineIssues”) – This will save the data to a collection called “OfflineIssues”.
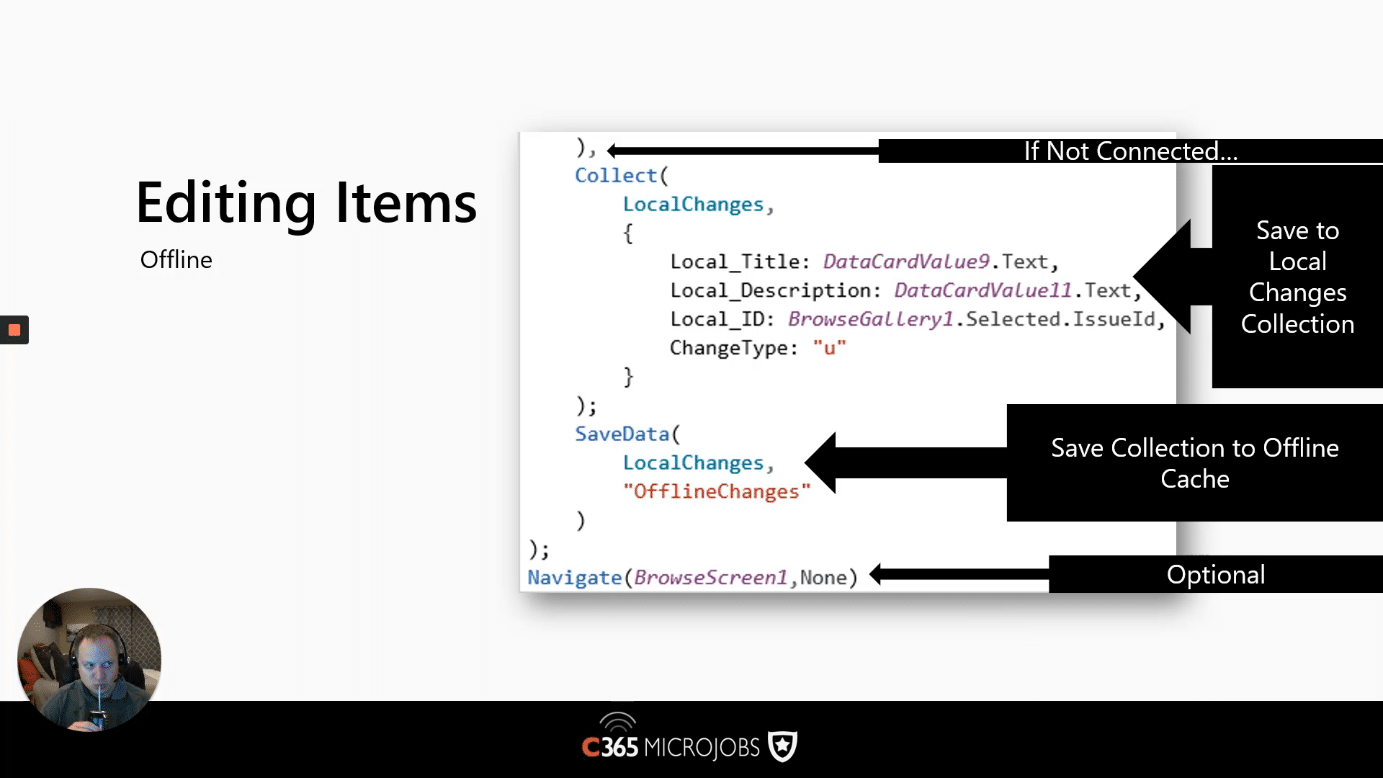
How to edit items when you are disconnected from the Internet
The slide below omits the If (Connection.Connected) purposes, but this is still how we test. If this returns “false” that this code will run and this is how we handle an item being edited.
- Collect(LocalChanges, { … }) – Add the changes made in the UI to a our local collection called “LocalChanges”.
- SaveData(LocalIssues, “OfflineChanges”) – This will save the data to a collection called “OfflineChanges”.
- Navigate(BrowseScreen1, None) – regardless of whether the device is offline or online, we will then navigate to a screen called “BrowseScreen1”, which will show the data.
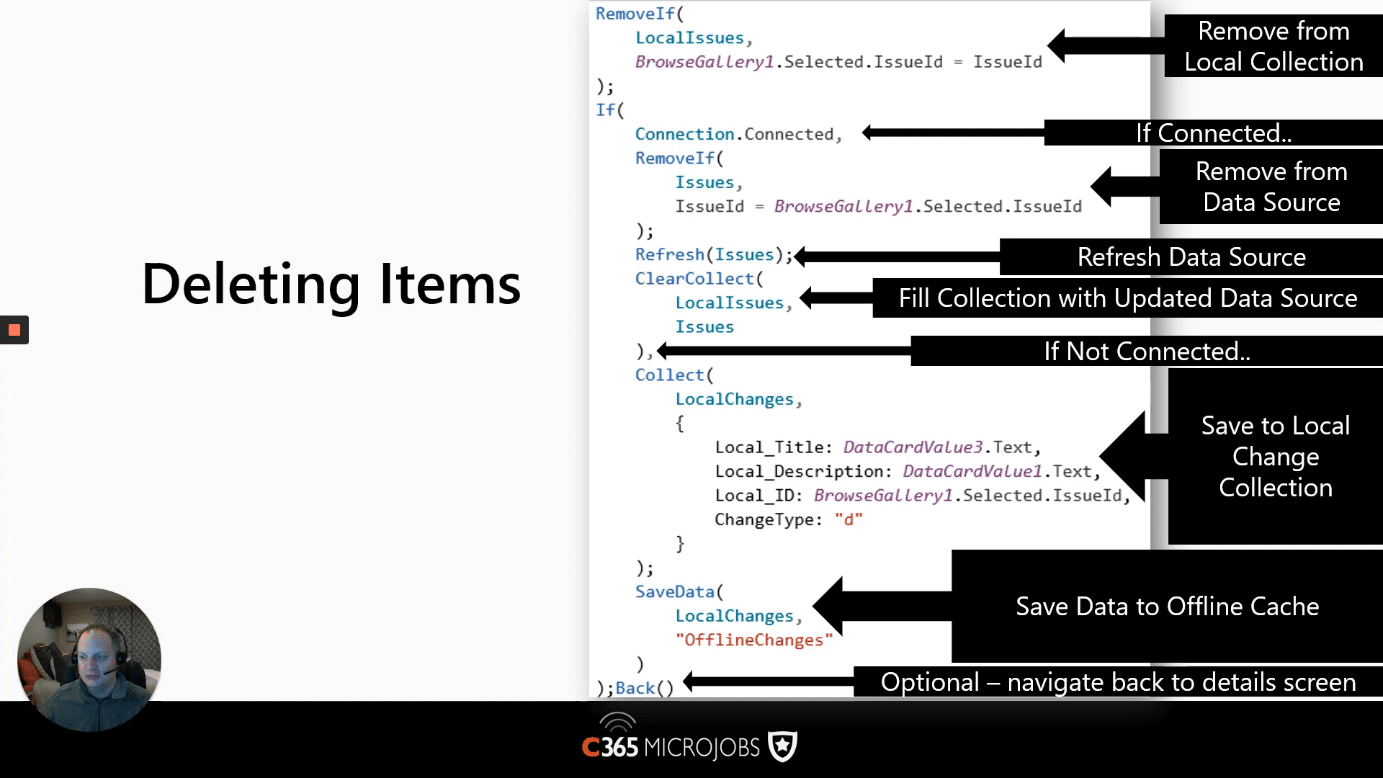
How to delete items in a connected and disconnected scenario
If we are connected:
- RemoveIf(Issues, IssueId = BrowseGallery1.Selected.IssueId) – Delete a record matching the selected Issue Id.
- Refresh(Issues) – Now that we’ve deleted the data record, we need to refresh the records in the “Issues” data source.
- ClearCollect(LocalIssues, Issues) – Fill the collection with the updated data source.
If we are disconnected:
As we can’t commit the deletions we need to store them locally and flag them to be deleted when we sync back up online.
- Collect(LocalChanges, { …, ChangeType=”d” } – Save the record and flag is it to be deleted with a “ChangeType = “d”).
- SaveData(LocalIssues, “OfflineChanges”) – This will save the data to a collection called “OfflineChanges”.
How to sync changes when your PowerApps is reconnected?
Now that we’ve discovered good ways to store our edits and deletes in a local connection on the device, we need to work out how to commit these changes when the phone is connected again. One elegant and simple way to achieve this is to use a Timer Control and have it check every 30 seconds. The timer control will simply run (every 30 seconds) and if it’s connected will sync the changes back. The Slide below illustrates the process at a high level.
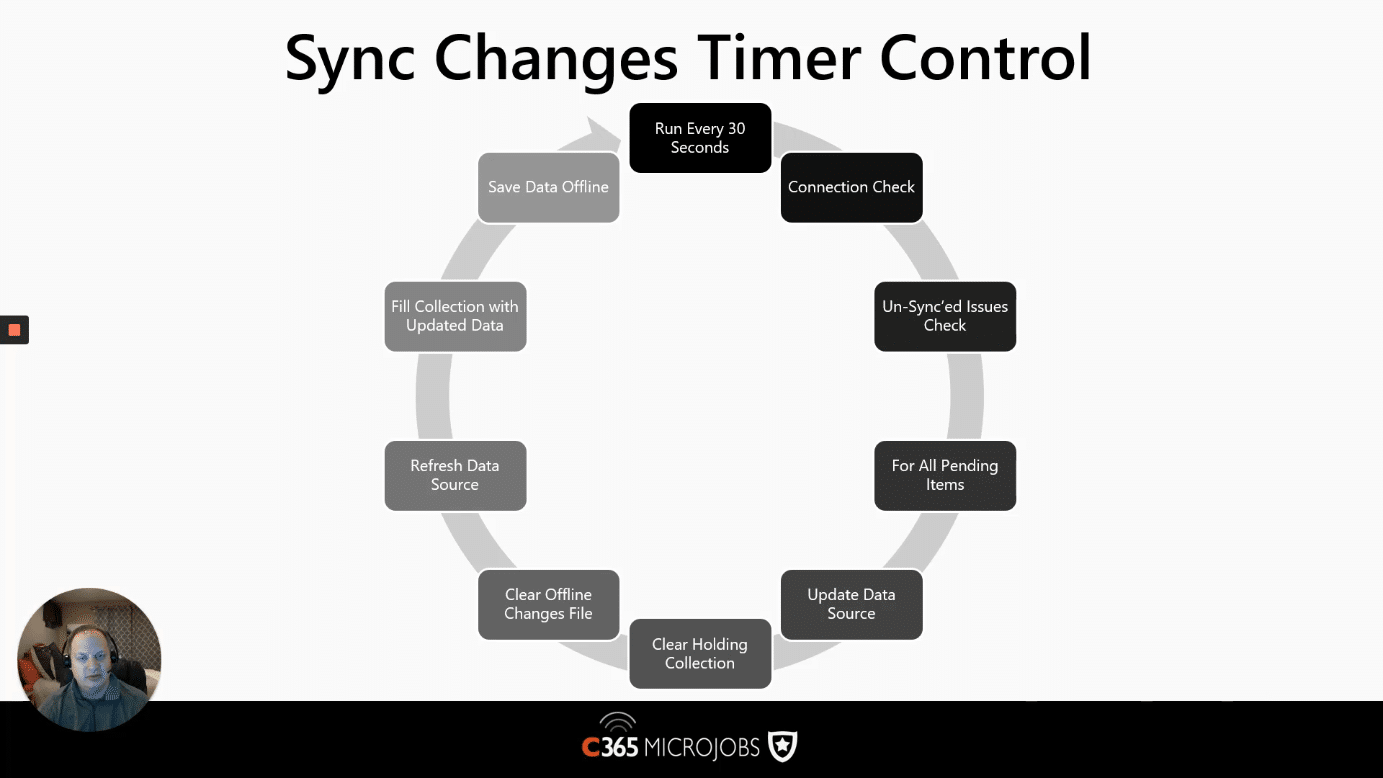
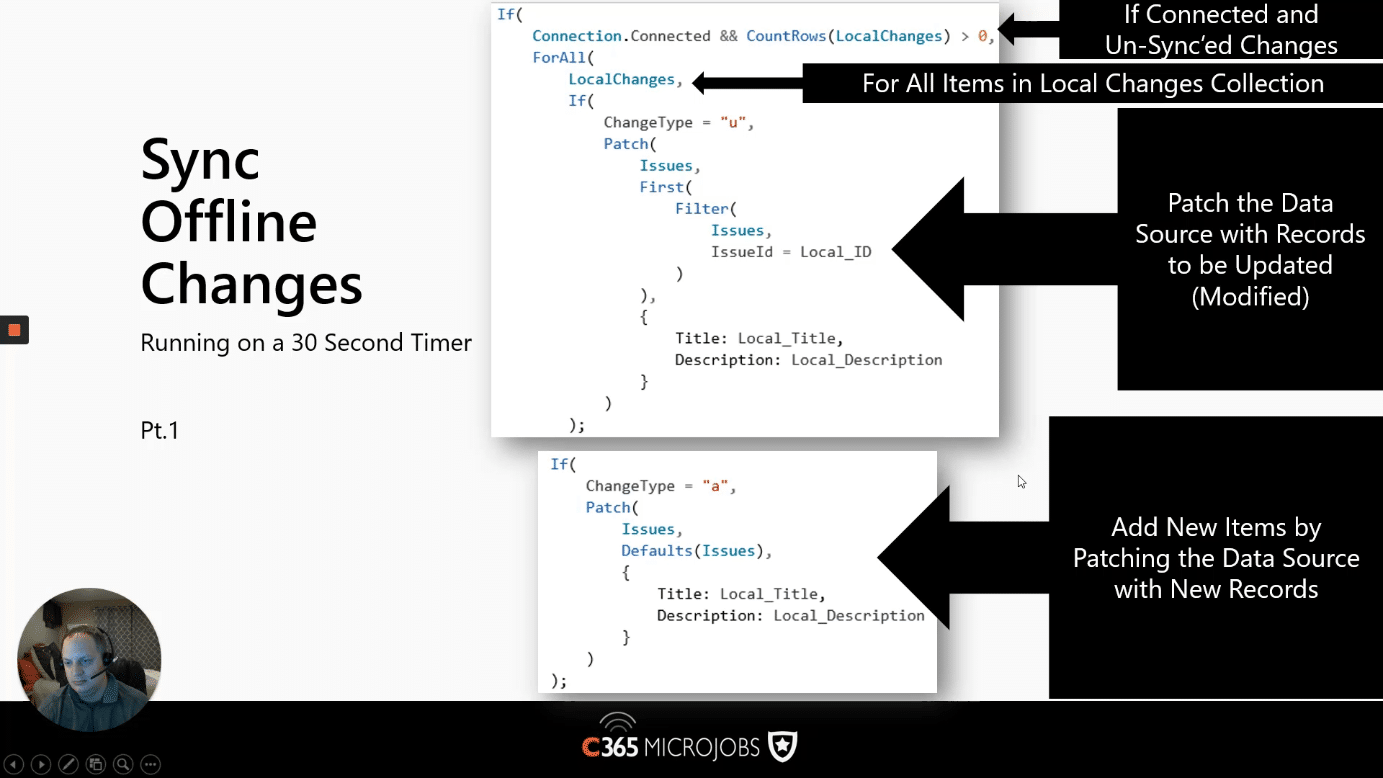
Steps to sync Offline Changes
- If (Connection.Connected && CountRows(LocalChanges) > 0, … – If we are connected and we have at least 1 record to sync back.
- ForAll(LocalChanges, – Iterate through every pending change in the “LocalChanges” collection.
- If (ChangeType = “u” – We only want to process updates (not deletes) at this stage.
- If (ChangeType = “a” – We only want to process new records.
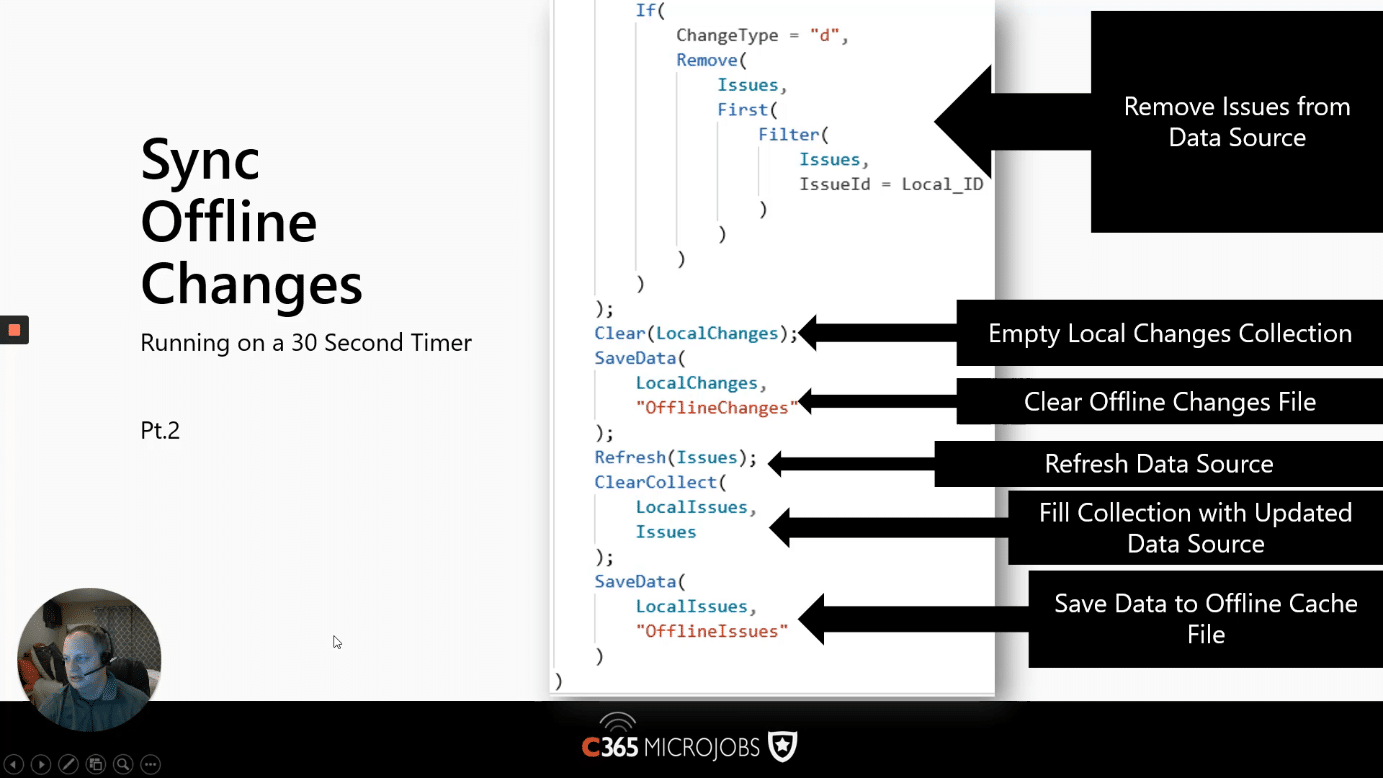
How to sync “deletes” back to the data source
- If (ChangeType = “d” – We only want to process deleted records.
- Remove(Issues, First(Filter(Issues, IssueId = Local_ID))) – Deletes the record matching the current Issue Id (in the loop).
- Clear(LocalChanges) – Empty out our local changes as we’ve not processed the records.
- SaveData(LocalChanges, “OfflineChanges”) – This will save (the cleared collection) to a file called “OfflineChanges”.
- Refresh(Issues) – Gets the latest data from the data source.
- ClearCollect(LocalIssues, Issues) – Fill the collection with the updated data source.
- SaveData(LocalIssues, “OfflineIssues”) – Save the new data to our offline collection.
How to handle security?
As you will be storing data locally, you do not want that data to be accessible by other users/applications on your device. For this reason, the storage is encrypted and it’s only possible to load data from the PowerApp that saved it. This means that PowerApps cannot share local data with each other.
What are the limitations with PowerApps?
I hope by this stage you have a really good idea how to deal with Offline features within PowerApps. In this section, I want to talk briefly about how some of the limitations that you should be aware of.
The first consideration is that you are limited by the amount of memory on the mobile device. You should be mindful that some mobile phones could be close to their memory limit so storing 100MB’s of data could result in an “out of space” issue.

Summary of Offline support
To review what we’ve covered let’s do a quick recap.
PowerApps offers built support for offline namely using LoadData(), SaveData() and Connection.Connected.
Although, this function is there to help it’s still largely up to the developer to wire the application up which will include building a UI that can work in both Offline and Online. You may also want to consider synchronisation issues and more importantly conflict resolution where the data has changed while the user is Offline.
To Debug your application, you will need to work on the mobile device due to the limitations of the browser.
Microsoft is making improvements in this area, so watch out for up and coming updates.
Need help?
If you need my help then please contact me on MicroJobs. I am willing to provide short term support, or can even build a fully-fledged PowerApps offering Offline support.