When I click on “sites” from the square icon on top left corner in Office365, it takes me to my personal page.
I want to change the Promoted Link set up so that I can view links that are hidden on second, and third line.
I want to set this up so that everyone in my site-collection – when the log on and get to their landing page, can see the same thing (multiple lines of viewable promoted links).
I also want to alphabetize them.
So, far, I had read up on some stuff online where I was advised to download a java script and install it. And it did not work.
Any advice? I have admin rights so I can make all modifications. How should I proceed?
Here is the image of the landing page:
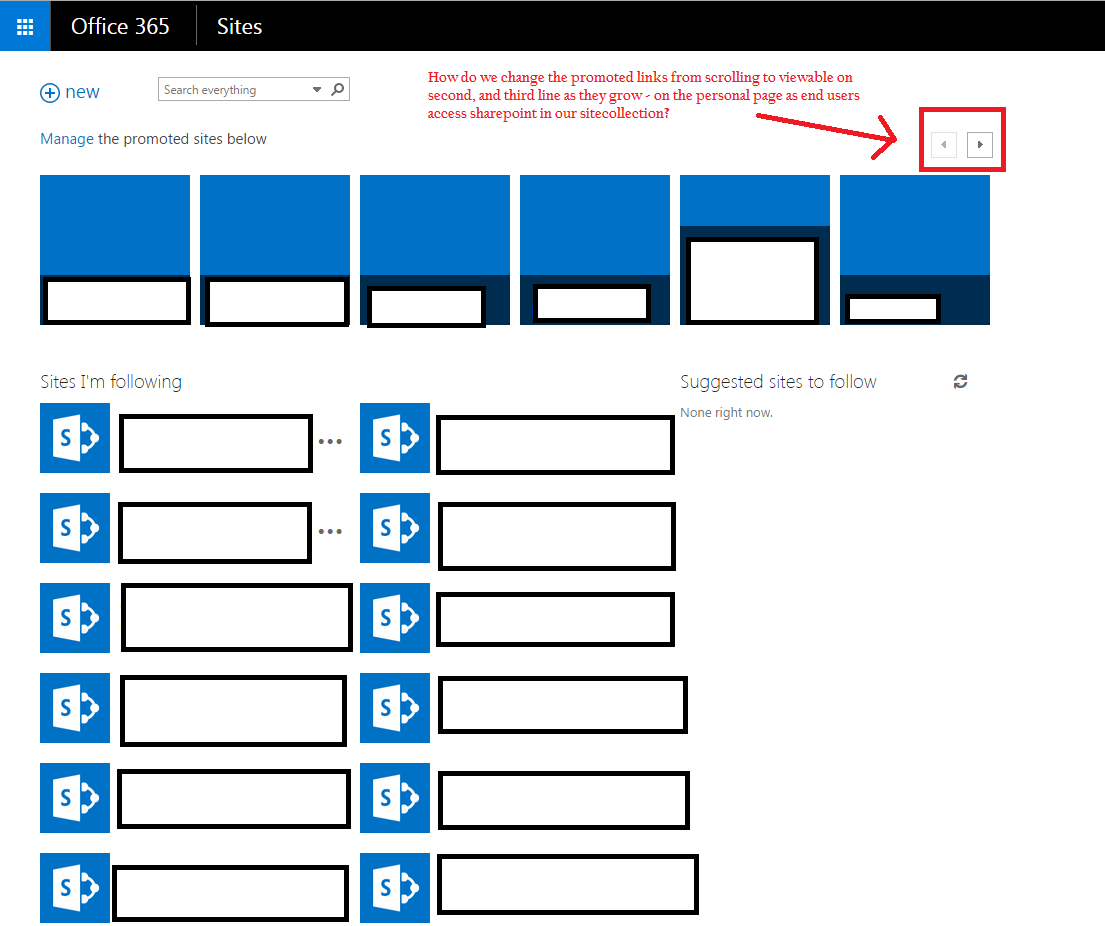
?width=750
To All Who Are Searching for Answer To My Question:
I had a talk with a Microsoft engineer and based on our conversation here is what I recommend:
Be advised that when you go to the landing page after clicking “Sites”, the customization of that page is not done on a universal scale. In other words, there is no site-collection Master page edits that will cascade down to display the changes at the sites.aspx level. That’s because the sites.aspx is the personal page of each individual associate; it is more like the Facebook page of your own; You can add content but cannot change the overall look of your personal page.
Having said that, if you want to allow multiple lines of promoted links to be viewed on your landing page, you will need to use SharePoint designer to insert the following script in your mysite.master page in the Master Pages from the left navigation panel.
Here are the steps you need to perform to display multiple lines of promoted links on landing page (sites.aspx). If all this sounds complicated, then don’t be confused; it IS complicated. Bottom line from Microsoft is this: if you want to display multiple lines of Promoted Links for all the associates’ landing page, then you will need to:
- Access each staff’s machine
- Download and launch SharePoint Designer
- Go to Navigation Panel
- Select Master Pages
- Then select mysite(you may have a number here, or not).master
- Click on Edit File
- Insert the script below (all the way down; but read through everything here first)
- Save and refresh
- Clean the cache of IE browser
- Close the IE Browser
- Launch the IE Browser
- Go to your sites.aspx page
- Hopefully by the time you complete steps 7-12, the system updates are in effect
- If you do not see changes, go back to step 8, refresh, and follow through to step 12
- If still fails, you will need to debug the issue
Please be advised that customizing the landing page (sites.aspx) will prevent Microsoft from automatically changing your page’s look and feel with their major updates. If you make the edits on the sites.aspx page, it will cause your landing page to not display any new change that Microsoft pushes down; you will not see the updated changes until you delete the script from the master page.
In order to allow Microsoft’s updated changes to be reflected on your sites.aspx page, you will need to:
- Do steps 1-6 above
- On step 7, select the script, delete it
- Do steps 8 – 13 above to complete the update and follow steps 14-15 if not successful.
(Quick Note: If you want to change the number of rows and columns for display, change the numbers in this part of the code:
For Rows: //ArrageRowsForPromotedWebPart(‘WPQ2-GettingStarted’, ‘promotedlinksbody_WPQ2’, 3);
For Columns (which is the next line on the script):
ArrageRowsForPromotedWebPart(‘WPQ5-GettingStarted’, ‘promotedlinksbody_WPQ5’, 5);
Here is the Script:
<script src=”https://code.jquery.com/jquery-latest.js” type=”text/javascript”></script>
<script type=”text/javascript”>
$(document).ready(function () {
var text = window.location.href;
var indx = text.toLowerCase().indexOf(“sites.aspx”.toLowerCase());
if (indx > 0) {
//All these code is for web part 2
// Update this value to the number of links you want to show per row
//ArrageRowsForPromotedWebPart(‘WPQ2-GettingStarted’, ‘promotedlinksbody_WPQ2’, 3);
ArrageRowsForPromotedWebPart(‘WPQ5-GettingStarted’, ‘promotedlinksbody_WPQ5’, 5);
}
});
function ArrageRowsForPromotedWebPart(rootId, bodyId, numberOfLinksPerRow)
{
// local variables
var pre = “<tr><td><div class=’ms-promlink-body’ id=’promlink_row_” + bodyId;
var post = “‘></div></td></tr>”;
var numberOfLinksInCurrentRow = numberOfLinksPerRow;
var currentRow = 1
//alert($(‘#’ + bodyId).length);
// find the number of promoted links we’re displaying
var numberOfPromotedLinks = $(‘#’ + bodyId + ‘ > .ms-tileview-tile-root’).length;
// if we have more links then we want in a row, let’s continue
if (numberOfPromotedLinks > numberOfLinksPerRow) {
// we don’t need the header anymore, no cycling through links
$(‘.ms-promlink-root > .ms-promlink-header’).empty();
// let’s iterate through all the links after the maximum displayed link
for (i = numberOfLinksPerRow + 1; i <= numberOfPromotedLinks; i++) {
// if we’re reached the maximum number of links to show per row, add a new row
// this happens the first time, with the values set initially
if (numberOfLinksInCurrentRow == numberOfLinksPerRow) {
// i just want the 2nd row to
currentRow++;
// create a new row of links
$(‘#’ + rootId + ‘ > table > tbody:last’).append(pre + currentRow + post);
// reset the number of links for the current row
numberOfLinksInCurrentRow = 0 } // move the Nth (numberOfLinksPerRow + 1) div to the current table row
$(‘#’+ bodyId + ‘ > .ms-tileview-tile-root:nth-child(‘ + (numberOfLinksPerRow + 1) + ‘)’).appendTo($(‘#promlink_row_’ + bodyId + currentRow));
// increment the number of links in the current row
numberOfLinksInCurrentRow++; }
}
}
</script>
Thanks for your input. I apologize as I may have not been clear about where this change was needed: at the sites.aspx page (landing page when you click on “sites” icon once is office365. I found a solution I will post soon.
The order of the promoted items is set in the Promoted Links list… here’s an article that shows you how to do it:
A little javascript will allow you to show the links in a second line
http://www.rbradbrook.co.uk/blog/2013/08/11/display-promoted-links-multiple-lines/
Hope these help.