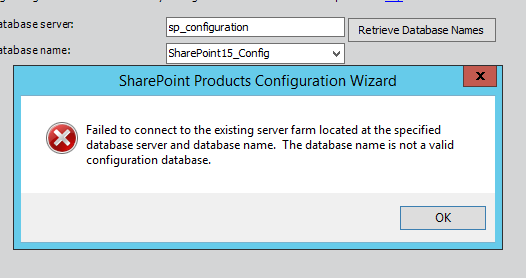
My development sharepoint server is giving an error as shown below after i installed and configured php, mysql and phpmanager on the same server..Is there a way to solve this without uninstalling those things? please find the attachment for the logs.
?width=750
Objectives:
The most important part of a company’s infrastructure is commonly a web server/email server. In this tutorial I will configure a Windows 2003 server with IIS, PHP5, MySQL, PHPMyAdmin and Microsoft SharePoint.
Materials Required:
– Windows 2003 Server Running Active Directory
– SharePoint ISO, Windows 2003 Server ISO, MySQL and PHP Installation Files
Assignment Details:
Install a fresh copy of Windows 2003 Server Enterprise in a VMware Environment. Once you have your VMware machine setup, locate and download MySQL and PHP on the internet for your project (see resources).
Recommendation: Place your PHP, IIS default website on a port other than 80.
Install PHPMyAdmin on your MySQL, PHP and IIS server.
Now that you have completed the first half of this project, the SharePoint Portal Server is your next challenge. One of growing needs in many companies now is a need for collaboration. Microsoft’s SharePoint service is becoming widely used in education and enterprise level businesses.
You can configure the following configurations:
– Website 1: PHPMyAdmin on Port 81 with Windows Authentication requiring access to view PHPMyAdmin
– Website 2: Directory with all project documentation files that are browseable, password protected with Windows Authentication, and running on Port 9900.
– Website 3: PHPINFO Page serving as default.php and a custom error page for Errors 404 and 403.
– Website 4: SharePoint Portal Site on specified port. SharePoint site should house project documentation.
1. Server Installation & Configuration
First off I installed VMware, then made a new virtual machine with an 8GB NTFS partition. I then installed Windows Server 2003 Enterprise Edition to that virtual machine.
Custom IP Configurations:
– IP Address: 142.25.97.78
– Subnet Mask: 255.255.255.128
– Default Gateway: 142.25.97.126
– DNS: 142.25.115.12
– DNS 2: 142.25.115.1
To make sure that my server was secure, I installed AVG Free Anti-Virus software and ran Windows Update to make sure everything was up to date (eg. Service Pack 1).
Backup Plan/Recovery Plan: Download Cobian Backup and configure it to backup all updated files at 12:00am each day. If anything goes wrong, revert back to the backed up files.
2. IIS Installation & Configuration
To install IIS, I went to Add/Remove Programs, and Add/Remove Windows Components and checked IIS, then it automatically checked Enable network COM+ access. I pressed Next and it did all the installation for me.
To change the port number in which a website runs off in IIS, in the left panel of IIs Manager right click Websites and click properties and change the TCP port to desired port number. Then when you want to view that webpage you have to put :port number at the end of the URL or IP (eg. 142.25.97.78:81).
It is suggested that the IIS Lockdown tool is used on IIS versions 4 and 5, but 6 does not need this to be done.
3. PHP Installation & Configuration
To install PHP5, download the zip (not Windows Installer) version and unzip it somewhere on your hard drive. I recommend C:\PHP just to make things easy.
Download the “Collection of PECL modules for PHP 5.0.3” zip file and extract the contents of that file into C:\PHP\ext . This adds some more extentions to your PHP install.
Then in C:\PHP , rename php.ini-recommended to php.ini . These .ini files are preconfigured settings for a PHP install that you can use as an initial setup and php.ini-recommended is the most secure.
In php.ini , uncomment cgi.force_redirect and set equal to 0.
A browscap file is used to determine what browser the user is viewing the webpage in and install of this is recommended because it is widely used in scripts. Just download php_browscap.ini from http://www.garykeith.com/browsers/downloads.asp to C:\PHP\extras and change the browscap variable in php.ini to be the full path to the file (eg. browscap=C:\PHP\extras\browscap.ini).
I also created a session state directory. I created mine at C:\PHP\Sessions , and this folder will be used to save the session variable information for PHP. Then just change the value of the session.save_path variable in php.ini to be the full path to that directory (eg. session.save_path=C:\PHP\Sessions).
You need to point PHP to the directory that holds the extension libraries and you need to rearrange the list of extensions so that they’ll load without throwing errors. You’ll also then have to comment and uncomment the desired extensions. Set extension_dir in php.ini to C:\PHP\ext .
This is the order I put my extensions in:
extension=php_mbstring.dll
extension=php_bz2.dll
extension=php_cpdf.dll
extension=php_curl.dll
extension=php_dba.dll
extension=php_dbase.dll
extension=php_dbx.dll
;extension=php_exif.dll
extension=php_fdf.dll
extension=php_filepro.dll
extension=php_gd2.dll
extension=php_gettext.dll
;extension=php_ifx.dll
extension=php_iisfunc.dll
extension=php_imap.dll
extension=php_interbase.dll
extension=php_java.dll
extension=php_ldap.dll
;extension=php_mcrypt.dll
extension=php_mhash.dll
extension=php_mime_magic.dll
extension=php_ming.dll
extension=php_mssql.dll
extension=php_msql.dll
extension=php_mysql.dll
extension=php_mysqli.dll
;extension=php_oci8.dll
extension=php_openssl.dll
;extension=php_oracle.dll
extension=php_pdf.dll
extension=php_pgsql.dll
extension=php_shmop.dll
extension=php_snmp.dll
extension=php_sockets.dll
;extension=php_sybase_ct.dll
extension=php_tidy.dll
extension=php_ffi.dll
extension=php_xmlrpc.dll
extension=php_xsl.dll
;extension=php_yaz.dll
extension=php_zip.dll
The ones that are commented are that way because they may not work without extra software installed.
Now we need to add C:\PHP to the server’s PATH environment variable. Right click on My Computer and click Properties. Click the Advanced tab and click the Environment Variables button. Double click the PATH variable in the list of system variables. Just add C:\PHP; to the beginning or ;C:\PHP to the end and then restart the server.
To let PHP know where to find its configuration file, copy and save this registry code as inifilepath.reg and then run it. After its been run you can delete it.
Windows Registry Editor Version 5.00
[HKEY_LOCAL_MACHINE\SOFTWARE\PHP]
“IniFilePath”=”C:\\PHP”
Now to configure IIS with PHP, open IIS Manager. This can be found from Start > Administrative Tools.
To add and allow the PHP ISAPI Extension to IIS Web Service Extensions (C:\PHP\php5isapi.dll), expand local computer in the left pane and click on Web Service Extensions. In the right pane, click the blue underlined text “Add a new Web service extension”. Make “PHP ISAPI Extension” the Extension name and click the Add button and browse to the php5isapi.dll file in C:\ . Check “Set extension status to Allowed” and click OK.
To add .php as a new extension, expand local computer in the left pane and right click on Web Sites in the left pane, then click Properties in the menu that pops up and go to the Home Directory Tab. Click Configuration and go to the Mappings tab and click Add. Press browse to find php5isapi.dll in the Executable textbox and enter .php in the Extension textbox. Select radial button “Limit to”, enter “GET,POST,HEAD” and then accept all the changes by pressing OK.
To turn script permissions on, right click on Web Sites, go to Properties and the Home Directory tab, and change the Execute permissions dropdown to Scripts only.
Then just press the stop button and then the play button to restart the IIS server.
To test if PHP works now, copy this website code and put it into the root directory of the server as Test.php . To find the root directory, right click on a website and go into Properties to the Home Directory tab and look at Local Path.
<html>
<head>
<title>PHP Test</title>
</head>
<body>
<!– testing sessions –>
<?php session_start(); ?>
<!– testing browscap.ini –>
<?php
echo $_SERVER[‘HTTP_USER_AGENT’] . “<br/><br/>”;
$browser = get_browser(null, true);
print_r($browser);
echo “<br/><br/>”;
?>
<!– a general PHP test –>
<?php phpinfo(); ?>
</body>
</html>
Then just type the servers IP address/Test.php and it should work. If a message comes up on your server saying that it can’t parse browsecap.ini, just go into the file and delete whatever lines it specified in the error. I had a bunch at Line 200.
I couldn’t find any security hardening for PHP 5.2.0 , only 5.0.5
4. MySQL Installation & Configuration
To install MySQL I just went to their website and downloaded the Windows Installer of the latest Community Edition. I choose the Custom Setup and these settings:
– Developer Machine – MySQL Server should only use a minimal amount of memery.
– Multifucional Database – Optimizes server to use the fast transactional InnoDB and high speed MyISAM storage engine.
– Decision Support (DSS)/OLAP – A database that doesn’t require a lot of concurrent connections, 20 connections will be assumed.
– Enable TCP/IP Networking – Port Number 3306
– Enable Strict Mode – This option forces the server to behave more like a traditional database server.
– Standard Character Set – Makes Latin1 the default charset. This charset is suited for English and other West European Languages.
– Install As A Windows Service – The recommended way to run the MySQL server on Windows. Service name MySQL. Launch the MySQL Server automatically.
– Modify Security Settings – Add a root password and enable access from remote machines.
5. PHPMyAdmin Installation & Configuration
Download PHPMyAdmin and put the folder into your root web directory. For PHPMyAdmin to be public, you have to add the IIS user to the folder and give it permissions. For this you have to go the folder, right click and click properties. Go to the Security tab, and click add to add the IIS user. Press Advanced, and then click Find Now to find all the users on the computer. In the list, mine was called IUSR_MATT. Double click the name and then OK. Then in the box of users, click the one you just added and in the permission box, click Full Control. Click apply and OK. This should allow you and internet users access to the folder.
Then go to the servers IP address:port number/PHPMyAdmin . You will probably get an error page saying “Welcome to PHPMyAdmin. Error: MySQL said: #1045 – Access denied for user ‘root’@’localhost’ (using password: NO)”. This is because you have a root password on your MySQL. To fix this error, click the setup script link, and scroll down to where it has a gray box that says Servers and click the Add button. This is how I configured mine:
– Authentication type to http
– User for config auth – root
– Password for config auth
– PHPMyAdmin control user – root
– PHPMyAdmin control user password
Then press add. Then in the gray box that says Configuration click display, and it shows the temperary configuration file you just created. Copy that and find a file in the base folder of PHPMyAdmin called config.inc.php or copy it into the sample file config.sample.inc.php and rename it config.inc.php .
6. SharePoint Installation & Configuration
Before installing Sharepoint, install .Net framework 3.0 and also make sure that in IIS in the left panel under Web Service Extensions that ASP.NET v2 is set to allow. Now begin installation of SharePoint and choose Basic Install: Install single server standalone using default settings. Run the SharePoint Products and Technologies Configuration Wizard to finish installation.
7. Sites
Create folders and sites inside the root web directory and use IIS Manager to configure them.
To create custom 403 and 404 error pages, just edit the existing .htm error files. To find where these files are, right click a website in the left pane of IIS Manager under Websites and click properties. Click the Custom Errors tab and there should be the path to the Windows Error Page folder.
Finally i was able to solve this problem without uninstalling those things. If in case anyone here encountered the same problem, let me know so i can post the solution that worked for me.